
Fiber cement siding and AZEK:
Overview:
Wikipedia definition: Fiber cement is a composite material made of sand, cement and cellulose fibers. In appearance fiber cement siding most often consists of overlapping horizontal boards, imitating wooden siding, clapboard and imitation shingles. Fiber cement siding is also manufactured in a sheet form and is used not only as cladding but is also commonly used as a soffit / eave lining and as a tile underlay on decks and in bathrooms.
Hardi plank website information connection.
http://www.jameshardie.com/homeowner/index-all.shtml
Hardiplank installation brocure:
http://www.jameshardie.com/pdf/install/hardieplank-hz5.pdf
Question:
Why would a carpenter use a story pole when siding? How does it help his or her work?
What does building paper do? Why is it important to locate the studs when installing siding? What is fiber cement siding made from and why do we pre-drill when installing?
Creating a story pole
Fiber cement is tougher than other materials
Installing fiber cement siding
Fiber cement looks identical to wood once it’s painted.
When you want the classic look of wood siding coupled with lifetime durability, fiber cement siding may well be your best choice. Fiber cement siding is a composite made of Portland cement, silica and wood fiber. Once painted, it looks almost identical to wood. It’s available in many styles and widths, both smooth and wood textured, and you still get the crisp joints and details that’ll make your home’s exterior stand out. In addition, it’s highly rot and insect resistant, won’t burn and paints beautifully.
Contrary to expectations, fiber cement is somewhat flexible, not brittle. It installs very much like traditional wood siding with a few easily mastered techniques that we’ll demonstrate in this story. You can hand-nail it, although we recommend you drill 1/8-in. pilot holes. It drills easily with ordinary twist bits and cuts easily too, although with lots of dust. Because ordinary wood-cutting blades dull quickly, we’ll tell you what blades to use. If you’ve ever worked with wood siding, you’ve got the skills and tools to handle fiber cement as well.
Install fiber cement using a few special techniques
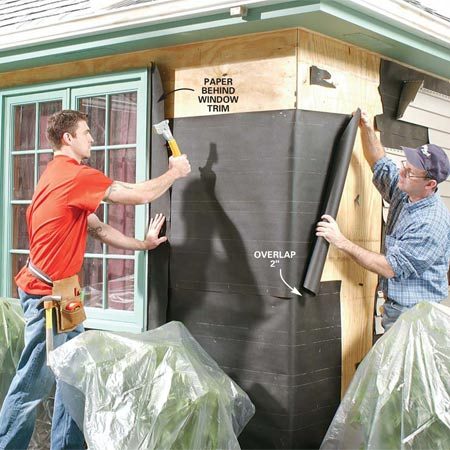
Photo 1: Staple building paper to the sheathing
Mark stud locations at the top and bottom of the wall. Staple building paper to the wall sheathing, lapping top pieces over bottom pieces by at least 2 in. Fit and slide paper behind the window trim.
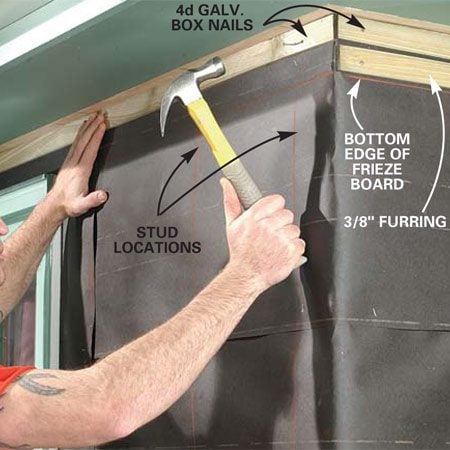
Photo 2: Nail furring strips at the top of the wall
Snap chalk lines to mark the frieze board location and nail treated furring strips along the lines. Keep the bottom strip 1/4 in. above the bottom line.
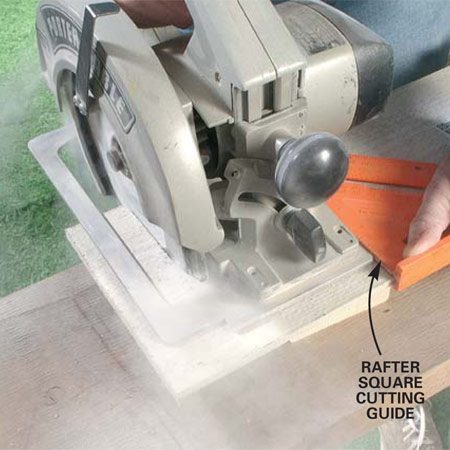
Photo 3: Use a circular saw to cut the frieze board
Cut the frieze board to length with a circular saw, using a rafter angle square as a cutting guide. True up cut ends with a rasp or a sanding block.
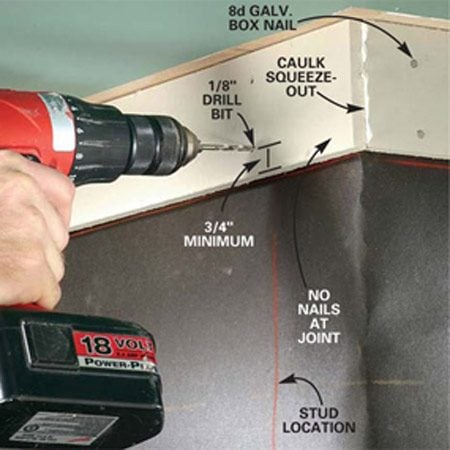
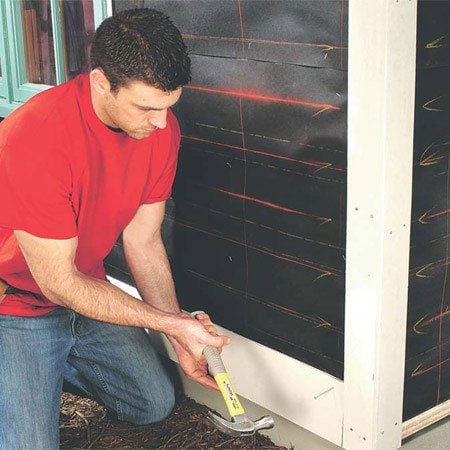
Photo 4: Predrill holes for easy installation
Predrill and nail the frieze boards, driving two galvanized box nails into each stud. Hold the nails at least 3/4 in. from the edges. Drive the nailheads snug with the surface of the siding. Do not overdrive them. Apply caulk at the corner lap joint before installing the second piece.
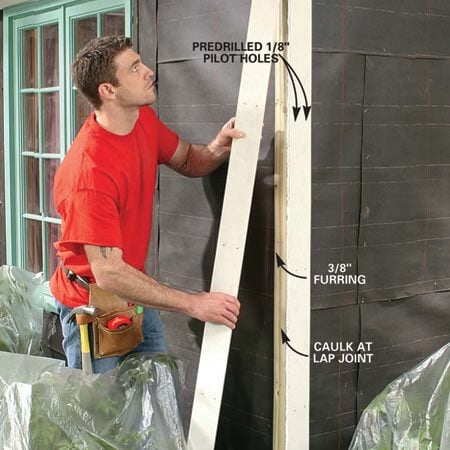
Photo 5: Nail up the corners boards
Install the corner boards, lapping one over the other with caulk in the joint. Nail every 16 in. with a pair of 8d galvanized box nails.

Inside corner detail
Lap inside corners the same way as outside corners.
The layout process is exactly the same as for wood siding. Mark the stud locations with a pencil on the soffit and foundation where they won’t be covered by the building paper. Install the building paper (Photo 1), then follow your stud location marks and snap chalk lines (Photo 2) to guide both your nailing and your placement of siding joints. We’re also using fiber cement trim boards. Since they’re only 7/16 in. thick, rip 3/8-in. thick strips from treated 2-by lumber and use them to fur out the frieze boards (Photo 2). Now they’ll sit about 1/8 in. above the lap siding.
Cut the frieze board to length (Photo 3). Fiber cement siding is highly abrasive. Even a carbide tooth blade will last for only part of the day. At home centers, you can buy diamond blades made specifically for cutting fiber cement. These blades cut quickly and create less dust. But we had success with a less expensive dry-cut, diamond masonry blade. Drill cutouts for electrical boxes and pipes with regular twist bits or spade bits, and make interior or even curved cuts with a jigsaw fitted with a tungsten or carbide grit blade (these blades are available at home centers and tile stores). Cutting fiber cement siding raises a lot of silica dust, so work outside and wear a dust mask.
Nail up the frieze board by drilling 1/8-in. pilot holes and driving two galvanized box nails at each stud (Photo 4). Your nail length may vary from ours depending on the type of exterior sheathing used on your home. In general, use nails that penetrate the studs at least 1 in. Drive the nailheads snug against the fiber cement board. If driven too deep, the heads will crush the fiber cement board and reduce the nail’s holding power. Don’t nail fiber cement corners together (Photo 4). A nail driven into the edge of a fiber cement board will split it.
Next make the outside corner (Photo 5), following the same steps as for the frieze boards. Be sure the bottoms of the corner boards cover about 1/2 in. of the foundation.
Tip:
If you don’t have access to a table saw, buy a sheet of 1/2-in.treated plywood and rip furring strips with a circular saw.
Caution!
Cut outdoors, wear a dust mask to avoid breathing the dust, and keep others away.
Layout the siding courses
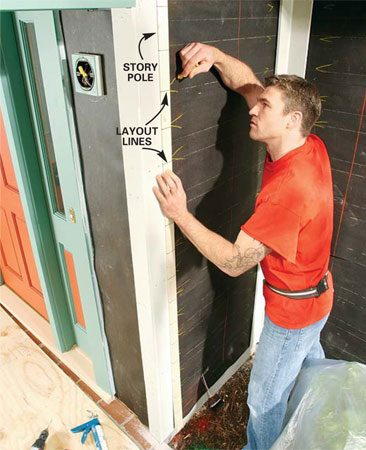
Photo 6: Mark the siding course locations
Mark the top of each siding course using the story pole as a guide (see “Making a Story Pole.”). Then snap chalk lines to keep each course straight.

Photo 7: Install the first course of siding
Nail a 3/8-in. treated starter strip along the bottom of the wall. Then cut and nail the first course of siding along the layout line. Leave a 1/8-in. gap at the end, and nail at each stud with a single 8d galvanized box nail held 1 in. down from the top edge.
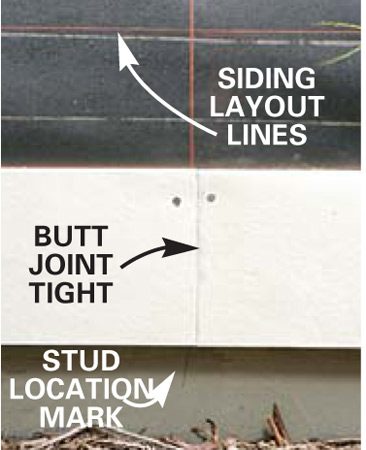
Butt joint detail
Butt the siding courses tight together.
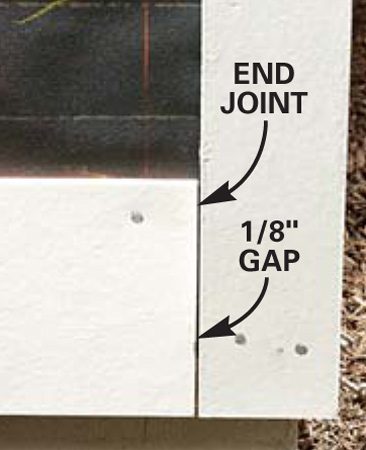
End joint detail
Leave a small gap between the siding and the corner trim.
With the trim boards completed, lay out the siding courses with a story pole. (See “Making a Story Pole.”) Hold the top of the story pole snug against the frieze board and mark out the siding courses (Photo 6) at all corners and around windows and doors. Following these layout marks, snap horizontal chalk lines. Remember that these layout lines represent the top of each siding course.
Rip and nail up a 3/8-in. thick treated wood starter strip along the bottom of the wall (above the foundation). This strip will tip the first piece of siding to the proper angle. Measure and cut to length the first piece of siding and nail it in place (Photo 7).
Leave a 1/8-in. gap where the end meets the corner board (Photo 7, inset) and make sure the other end lands on a stud line. Install the next piece so its end butts lightly against the first (Photo 7, inset). Continue with the siding courses, aligning the top edges to the layout chalk lines. Be sure to stagger the butt joints so they don’t lie on top of each other as you work your way up.

Mark layout lines on story poles, then use the poles
to mark the courses of siding on the wall.
Making a Story Pole
Cut a straight 1×2 so its length runs from the frieze board to the bottom of the first siding course. Measure up from the bottom of the story pole to mark the full width of the first course of siding (6-1/4 in. in our case). Remember, this mark represents the top of the siding piece, not the bottom of the second course.
From this point, make marks up the pole every 5 in. or the recommended exposure for your siding. The top course should be at least two-thirds the width of the lower courses (ours was too narrow, so we decreased the exposure to 4-7/8 in.).
When the final layout is OK, draw heavy lines on the face and both edges of the story pole using a square. Now hold the story pole tight against the frieze board at all corners and alongside windows and doors. Transfer the layout marks to the wall and snap chalk lines. This will ensure that all the siding courses go on straight and uniformly.
Tip:
Pros use pneumatic coil nailers (you can rent one) designed specifically for fiber cement siding. They cut nailing time in half. If you go this route, practice first to make sure the nailheads will be set flush.
Notch to go around windows
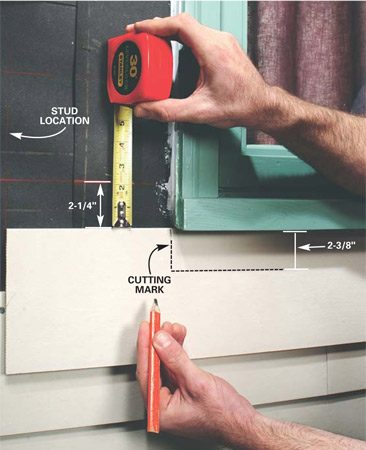
Photo 8: Mark the siding to fit under windows
Hold the siding snug under the windowsill and mark the window edge location. Then measure from the chalk line to the top of the siding. Add 1/8 in. to your measurement. This is the width of the cutout.
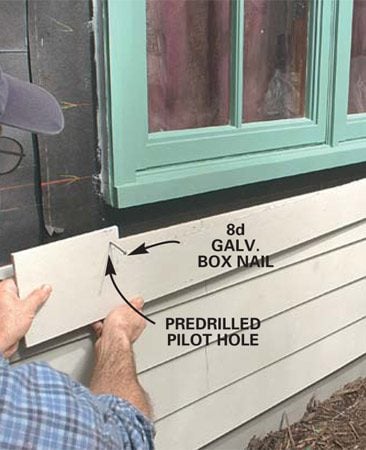
Photo 9: Install the notched siding under the window
Cut out the notch with your saw and slide the piece into place, leaving a 1/8-in. gap between the siding and windowsill. Caulk this gap later. Predrill and nail at each stud, including under the window.
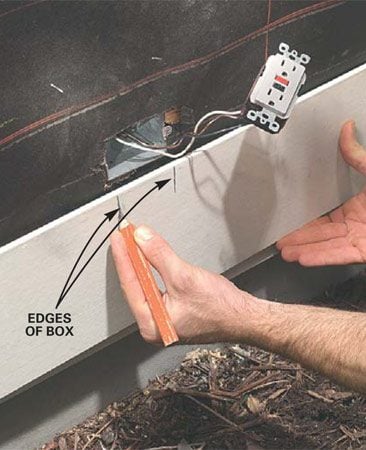
Photo 10: Mark cutouts in the siding
Hold siding in place under wall penetrations such as this electrical box. Mark the width and height of the cutout. Caution: Turn off the power to the receptacle before removing it from the box.
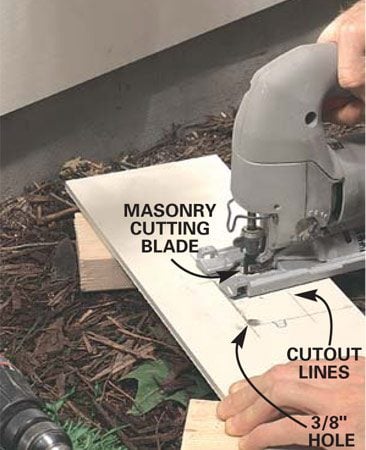
Photo 11: Make the cutout with a jigaw
Drill a 3/8-in. hole at the corner with a standard twist drill bit. Cut along the line with a jigsaw fitted with a carbide grit blade. Then nail up the piece of siding.
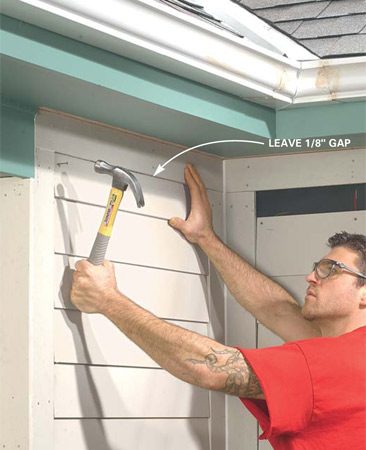
Photo 12: Cut and install the top course of siding
Cut the top course of siding to width and nail at each stud. Leave a 1/8-in. gap at the top edge. Fill all 1/8-in. gaps with acrylic latex caulk.
Notch to go around windows and doors (Photos 8 and 9). Be sure to allow a 1/8-in. gap where the siding meets the window trim and sill. This joint will be caulked later. Nail the top edge of the siding along the windowsill at each stud. These nailheads will be exposed, but the paint will cover them.
Water intrusion around wall penetrations can be a problem for any type of siding. Lay out and make the cutout for the electrical box (Photos 10 and 11). The electrical box cover is gasketed to seal out water. For pipes, electrical entries and similar fixtures, fit the siding as tightly as possible and then seal with a polyurethane caulk or non-hardening electrician’s putty. Rip the top course of siding to width and nail it up (Photo 12). Hold these nails 1 in. below the top edge. Again, these nailheads will be exposed.
Buy the siding already primed. If you prime it yourself, use an alkali resistant primer. Caulk all the joints with an acrylic latex caulk before applying the final coats of paint. Be sure the caulk fills the 1/8-in. joint completely to keep it watertight. Finish-coat with a 100 percent acrylic latex paint.
Tip:
If you live in a region of high rainfall or the wall is highly exposed to water, slip a 3-in. wide strip of building paper behind butt joints. Be sure the bottom edge of the paper laps on top of the lower course of siding.
Required Tools for this Project
Have the necessary tools for this DIY project lined up before you start—you’ll save time and frustration.
- Hammer
- Cordless drill
- Tape measure
- Circular saw
- Caulk gun
- Chalk line
- Level
- Drill bit set
- Dust mask
- Jigsaw
- Stapler
- Sawhorses
- Speed square
Required Materials for this Project
Avoid last-minute shopping trips by having all your materials ready ahead of time. Here’s a list.
- Fiber cement siding
- Caulk
- Building paper
- Furring strips
- 8d galvanized box nails
- Acrylic latex caulk
THE #1 BRAND OF TRIM.
AZEK® Trim with the AZEK Edge has precise sealed edges on all 4 sides (S4S). Long known for the unequalled combination of Uniformity, Durability, Workability, and Beauty, AZEK Trim has the proven performance and confidence of a building code report – ESR-1074.
AZEK Trim products, available in trim, sheets, cornerboards, and beadboard, offer many reasons to choose AZEK Trim for your next project. Using traditional tools and fasteners, AZEK Trim products can be worked just like wood – even mitered, routed, and turned on a lathe. For custom applications, AZEK Trim products can be laminated and even heat formed to create curves.
- Impervious to moisture and insects
- Perfect for ground contact application
- 25 year warranty
- Precise sealed edges on all four sides (S4S)
- Tightest board tolerance in the industry
- Easier to clean
- Maintains a “like new” appearance in all types of weather
- Does not require paint for protection
- Can be heat formed for unique shapes and designs
- Building Code listing ESR-1074
AZEK installation videos:
http://www.azek.com/azek-trim/installation/
AZEK corner boards:
http://www.azek.com/azek-cornerboards/
AZEK warranty information:
http://www.azek.com/azek-trim/warranty/
Azek Technical information: